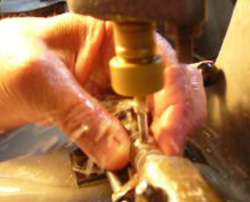
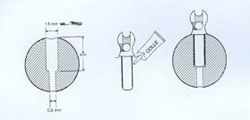
1 - You will need a diamond drilling bit to drill at 3,4 mm width - 5 mm long
1 - Perçage de la perle à 3,4 mm sur 5 mm de long |
 |
2 - Drilling of the pearl at 3,4 mm, always using water to refresh
2 - Le perçage nécessite un refroidissement constant
|
 |
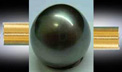
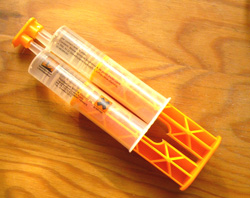
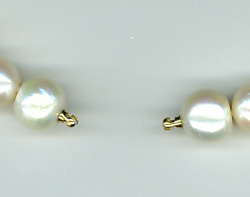
3 - Setting a tube at each end of the pearl
3 - Placer les tubes au bord du trou de perçage
|
|
4 - Always use a bi-component araldite type glue
4 - Utiliser de l'Araldite bi-composant et coller avant la fin de la phase de durcissement
|
 |
| |
2 - How to convert a necklace with changeable keys
Comment transformer le collier avec 2 clés
|
1 - Unstrung the strand and choose the 2 most beautiful pearls to put in front of the necklace
2- Defaire le rang de perles et choisir les 2 plus belles pour perçage (positionnement à l'avant du collier après remontage)
|
 |
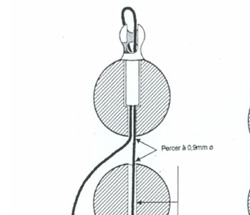
2 - Drill each pearl at 1,5 mm by 4 mm long
2 - Percer à 1,5mm de diamètre par 4 mm de long
|
|
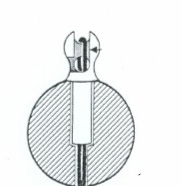
3 - Set the key at pearl's end
3 - Placer les clés à coller dans le trou de perçage
|
|
4 - Always use a bi-component alraldite type glue
Don't let any glue drop into key's hole
4 - Toujours utiliser un colle bi-composant
Attention à ne pas laisser une goute de colle dans le trou de la clé |
 |
5- Restring the necklace by displaying the most beautiful pearls in the front near the keys (see the guide in the menu)
5- Ré-enfiler le collier en mettant les plus belles perles devant, près des 2 clés
( voir le guide dans le menu)
|
 |
6 - The thread goes up and down the hole in the key
see next step in the menu or click here : how to string
6 - Passer le fil dans le tube, puis par-dessus la gorge et retour dans le tube
Prochaine étape, cliquez : comment enfiler le collier interchangeable |
 |